관련 포스팅
2025.04.12 - [Server/Supabase] - [Supabase] Supabase 사용하기
[Supabase] Supabase 사용하기
1. Supabase란?Supabase는 BaaS(Backend as a Service)로 서비스형 백엔드이다.프론트엔드단에서 백엔드 서비스를 제공해 주는 서비스 모델이다. 즉, 데이터베이스와 API를 구축하는 데 필요한 복잡한 설정과
rlawo32.tistory.com
Supabase를 NextJS 환경에 연동하여 직접 데이터를 조회한 뒤 처리하는 앱을 구현해보겠다.
1. Supabase 세팅하기 (with. TypeScript)
먼저 Supabase와 관련된 package를 npm을 통해 설치하자. 설치할 목록은 아래와 같다.
필요한 Supabase package 들과 추가로 Supabase를 통해 가져오는 데이터를 react-query를 사용하여 처리하기 위해 react-query와 더불어 Supabase와 호환성이 좋은 Supabase-postgrest-react-query를 설치해 준다.
// terminal

npm install @supabase/supabase-js
npm install @supabase/ssr
npm install @tanstack/react-query
npm install @supabase-cache-helpers/postgrest-react-query
typescript에선 Supabase에서 제공하는 type 파일을 다운로드하여 사용할 수 있다.
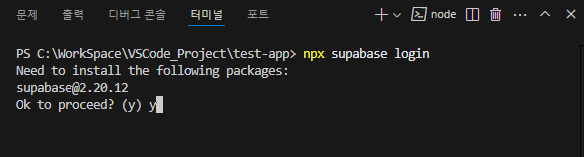
먼저 아래 명령어를 통해 Supabase에 login을 해주자.
// Supabase 로그인

npx supabase login
명령어 입력 후 y 입력해 준다.
아래와 같이 정상 연결이 되면 Enter을 입력해 준다.
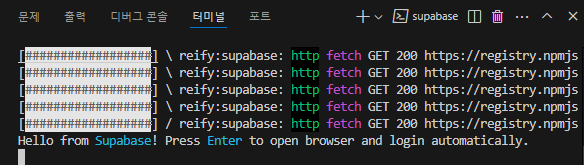
Enter 후 Supabase에 가입했던 계정으로 로그인을 하면 아래와 같이 무작위 코드를 발급해 준다.
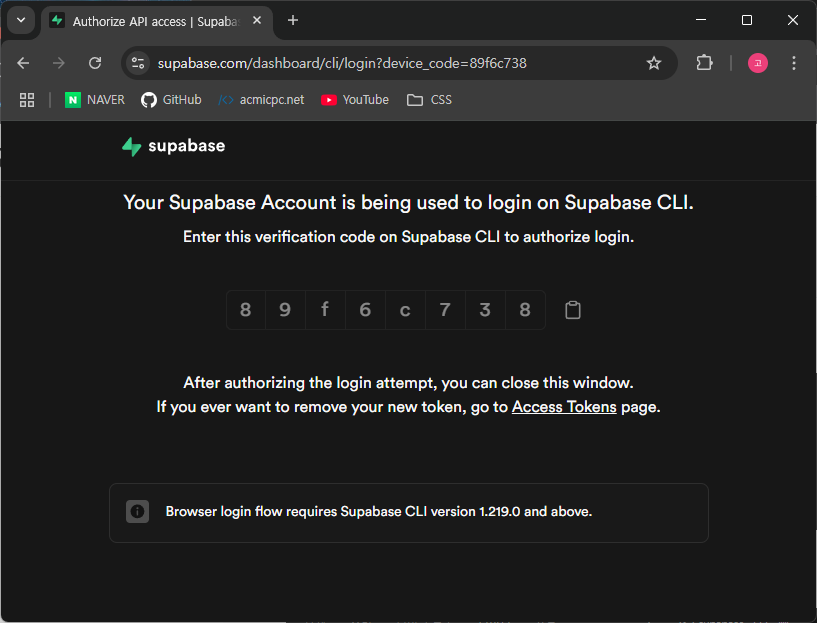
코드를 복사하여 터미널창에 입력해 준다.
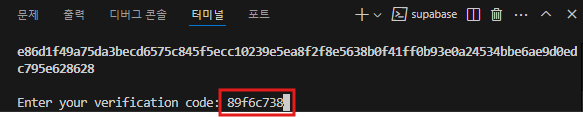
마지막으로 아래와 같이 Happy coding 메시지가 출력된다면 정상적으로 로그인되어 연결된 것이다.

로그인 연결이 성공적으로 완료되었다면 연결된 Supabase 프로젝트에 해당되는 테이블 type을 다운로드하기 위해 아래와 같은 명령어를 입력해 준다.
// Supabase type download & update

npx supabase gen types typescript --project-id {개인 Project ID} --schema public > {파일명 설정}
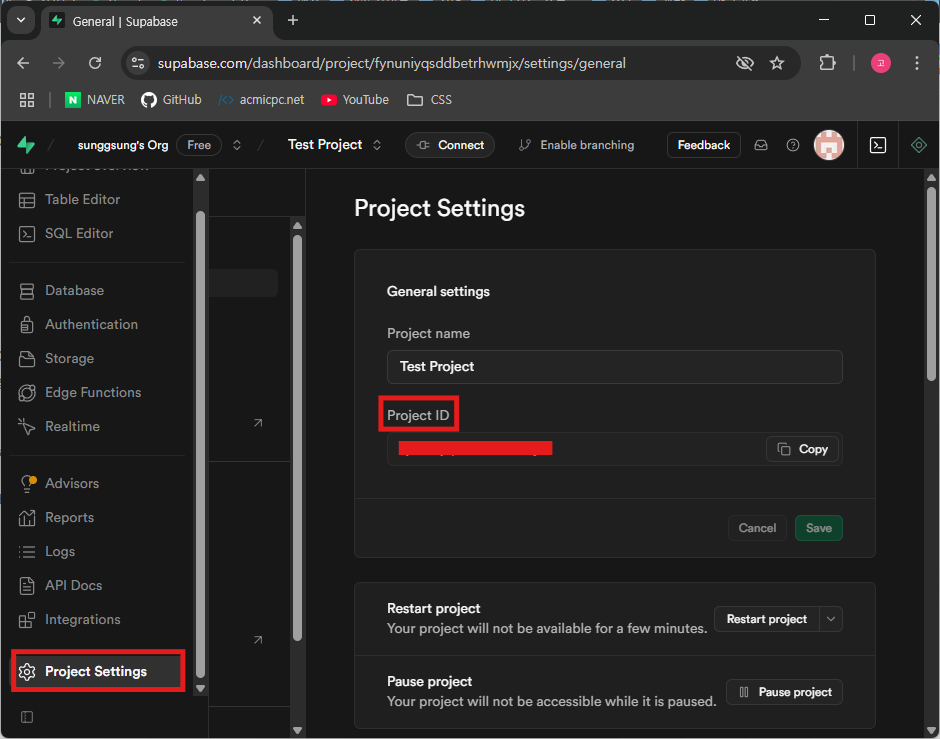
개인 Project ID는 Supabase 브라우저 메뉴에서 Project Settings로 이동한 위아래와 같은 위치에서 확인할 수 있다.
Project ID 확인 후 아래와 같이 터미널에 입력해 주자.

정상적으로 진행이 되었다면 프로젝트 디렉토리에 안에 설정한 이름으로 아래와 같이 type 파일이 생성된 걸 확인할 수 있다.
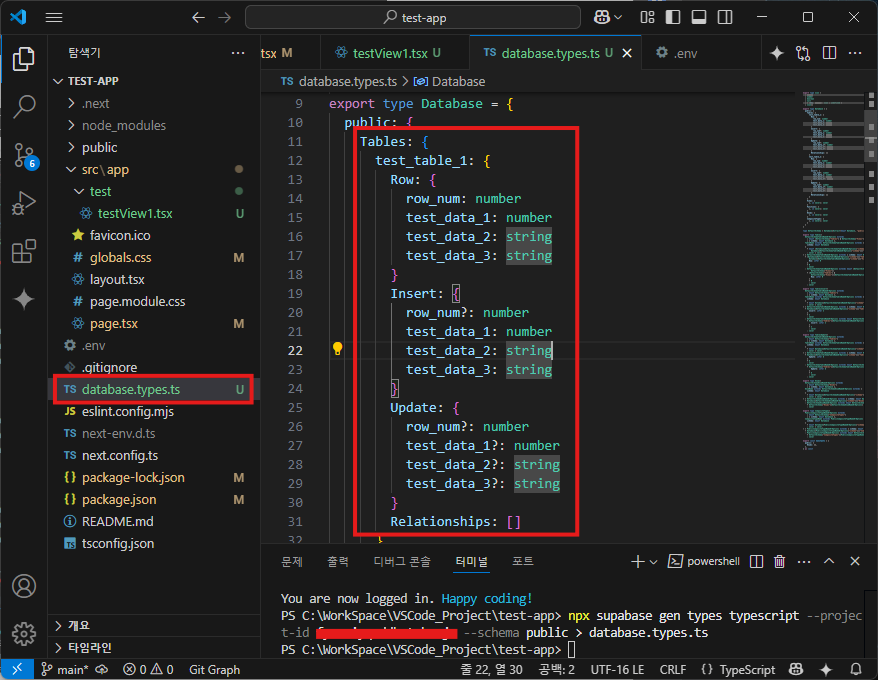
또한, 생성된 파일 내부를 살펴보면 자신이 생성했던 테이블에 대한 각 컬럼별 type이 설정되어 있는 걸 확인할 수 있다.
생성된 type 파일을 사용하여 Supabase를 사용할 때 꼭 테이블 컬럼 별로 Not Null을 설정해 주는 것이 추후에 코드를 작성할 때 편리하다. 그렇지 않으면 undefined type에 대한 처리까지 해야 하니 Supabase에서 테이블을 생성할 때 컬럼 옵션을 Not Null로 설정해 주면 좋을 것이다.
추가로 Supabase 프로젝트에 새로운 테이블 생성 및 수정, 삭제 등의 작업이 이루어졌다면 터미널에서 동일하게 type 다운로드 명령어를 넣어주면 자동으로 파일이 업데이트가 될 것이다.
2. Supabase Client 생성하기
클라이언트에서 Supabase를 사용하기 위해 Supabase API Key와 URL을 설정해주어야 한다.
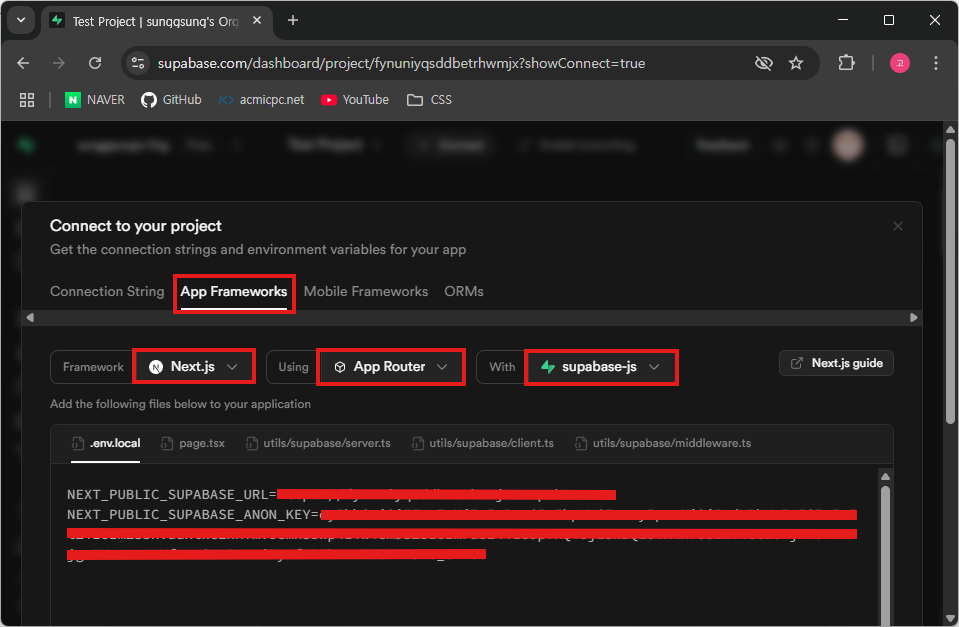
해당 설정 값을 확인하기 위해 Supabase 브라우저에서 상단 Connect 버튼을 클릭해준다.

그리고 발생되는 팝업창에서 App Frameworks 탭으로 이동 후 자신에게 맞는 Framework을 선택하고 Using, 사용할 연결 요소들을 선택하여 진행해 준다.
나는 NextJS 환경에서 .env 파일에 키 값과 URL을 설정할 것이기에 아래와 같이 확인 후 파일을 작성해 주었다.
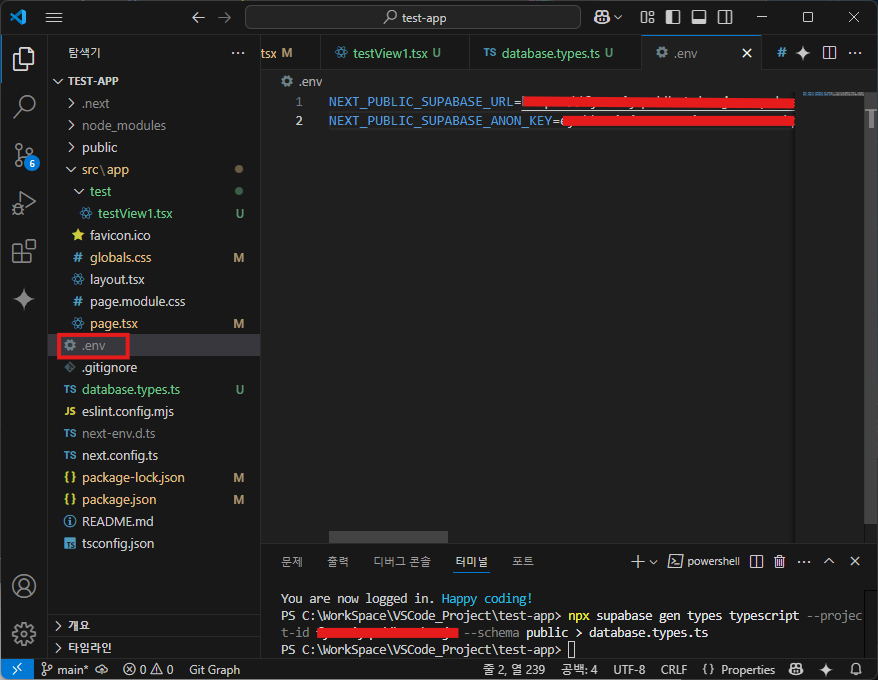
Supabase 브라우저에서 확인한 내용을 아래와 같이 그대로 .env 파일을 생성하여 작성해 주면 된다.
이제 Supabase Client 호출 파일을 작성해 주자. 여기서 앞서 세팅했던 Supabase type 파일을 사용하게 된다.
// supabase.ts

import { SupabaseClient } from '@supabase/supabase-js'
import { Database } from '../../database.types';

export type TypedSupabaseClient = SupabaseClient<Database>;
Supabase Browser Client 파일에서 API Key와 URL을 세팅하여 작성해 준다.
// supabase-browser.ts

import { createBrowserClient } from '@supabase/ssr'
import { Database } from '../../database.types';
import type { TypedSupabaseClient } from './supabase';
import { useMemo } from 'react'

let client: TypedSupabaseClient | undefined

function getSupabaseBrowserClient() {
  if (client) {
    return client
  }

  client = createBrowserClient<Database>(
    process.env.NEXT_PUBLIC_SUPABASE_URL!,
    process.env.NEXT_PUBLIC_SUPABASE_ANON_KEY!
  )

  return client
}

function useSupabaseBrowser() {
  return useMemo(getSupabaseBrowserClient, [])
}

export default useSupabaseBrowser
여기까지 완료되었다면 이제 Supabase API를 사용할 준비가 된 것이다.
추가로 react-query 사용을 위해 Provider 파일을 하나 작성하여 layout.tsx에 세팅해 주자.
// ReactQueryClientProvider.tsx

'use client'

import { QueryClient, QueryClientProvider } from '@tanstack/react-query'
import { useState } from 'react'

export const ReactQueryClientProvider = ({ children }: { children: React.ReactNode }) => {
  const [queryClient] = useState(
    () =>
      new QueryClient({
        defaultOptions: {
          queries: {
            // With SSR, we usually want to set some default staleTime
            // above 0 to avoid refetching immediately on the client
            staleTime: 60 * 1000,
            refetchOnWindowFocus:false,
          },
        },
      })
  )
  return <QueryClientProvider client={queryClient}>{children}</QueryClientProvider>
}
생성한 Provider는 아래와 같이 layout.tsx에 설정해 주면 된다.
// layout.tsx

import type { Metadata } from "next";
import { Geist, Geist_Mono } from "next/font/google";
import "./globals.css";
import { ReactQueryClientProvider } from "./ReactQueryClientProvider";

...

export default function RootLayout({
  children,
}: Readonly<{
  children: React.ReactNode;
}>) {
  return (
    <ReactQueryClientProvider> // react-query Provider
      <html lang="en">
        <body className={`${geistSans.variable} ${geistMono.variable}`}>
          {children}
        </body>
      </html>
    </ReactQueryClientProvider>
  );
}
파일 별 위치는 아래 이미지와 같이 세팅하였다.

3. Supabase 조회하기
이제 Supabase API를 사용하여 데이터를 SELECT 하여 출력해 보겠다.
우선 Query를 작성할 파일을 하나 생성하여 아래 예시와 같이 작성해 준다.
// query.ts
import { TypedSupabaseClient } from "../supabase"

export function getTestQuery(client:TypedSupabaseClient) {
  return client
    .from("test_table_1")
    .select("*")
    .order("row_num", { ascending: false })
}
나는 예시로 생성했던 test_table_1 테이블을 조회하는 쿼리를 작성하였다. 테이블에 저장되어 있는 데이터는 아래와 같다.

이제 작성한 쿼리 파일과 react-query를 사용하여 데이터를 가져와보겠다.
// testView1.tsx

'use client'

import { useQuery } from "@supabase-cache-helpers/postgrest-react-query";
import useSupabaseBrowser from "../supabase-browser";

import { getTestQuery} from "./query";

const TestView = () => {
    const supabase = useSupabaseBrowser();

    const { data: testData, isLoading: loading, isError: error, error: errorMsg } = useQuery(getTestQuery(supabase), {});

    return (
        <>
            {
                loading ?
                    <div>Loading...</div>
                    :
                error ?
                    <div>Error: {!!errorMsg}</div>
                    :
                    <>
                        {
                            testData ?
                                <div>{testData[0].test_data_1} : {testData[0].test_data_2} {testData[0].test_data_3}</div>
                                :
                                <div>Empty</div>
                        }
                    </>
            }
        </>
    )
}

export default TestView;
앞서 생성했던 파일들을 이용하여 react-query를 작성하였다. loading과 error 처리도 되어있으며, 위 예시 코드를 참고하여 자신의 입맛대로 커스텀하여 사용해 주면 되겠다.
react-query 옵션이나 query 작성법에 대한 내용은 추후에 따로 정리하여 포스팅을 하도록 하겠다.
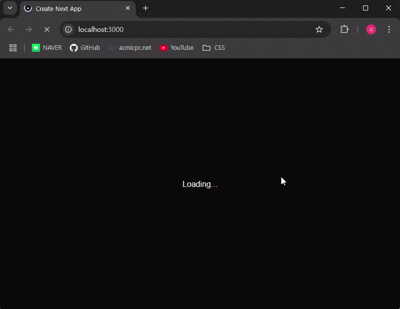
직접 실행한 화면은 아래와 같다.
Error 없이 새로 고침을 할 때마다 Loading 표시가 발생되며, 데이터가 정상적으로 출력되는 것을 확인할 수 있다.
'Server > Supabase' 카테고리의 다른 글
| [Supabase] Supabase 사용하기 (1) | 2025.04.12 |
|---|
